

Say thanks for these exercises.
Visit our e-book
project site.
Visit our e-book
project site.
This document has basic step-by-step exercises for programming combo and list boxes in Access2002. It is less useful as a reference document than as a source of detailed exercises. It is intended to provide first hand experience to students enrolled in Poynor's sections of MIS333k through a sequence of integrated steps.
Both of these controls are very useful for presenting lists from which users can make one or more selections. The combo, like a text box, can also be used to gather information in a form. This document, however, will only cover selecting items from a list. Limited additional reference material can be found in Novalis & Jones (check the Index), the Help system (see "Create a bound or unbound combo box"), and Viescas (check the Index).
We will be using wizards as we work through the beginning of this document. Later we will move into VBA for customizing the wizard-created combo boxes. If you find one of the steps below confusing (maybe it doesn't seem to work) then move to an earlier topic in list of the exercises. Many of the exercises make use of the results of exercises earlier in the list.

Your new "bare bones" form of company information should be showing at this point.
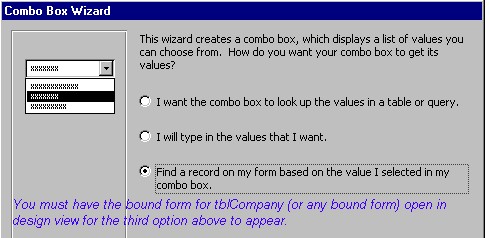
The purpose of this exercise is to show how easily this control can be implemented as a navigation aid. Open the form for tblCompany in design mode. Make sure the tool-box wizard-button is selected. Then click the tool box combo button and place a combo on the form.
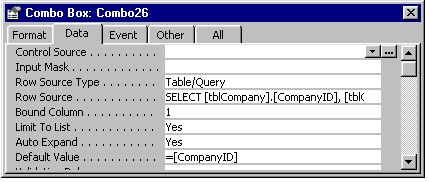
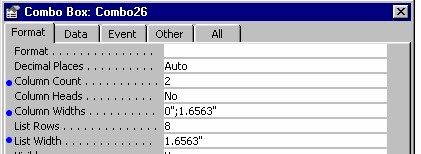
Your new combo box actually has two columns, but the PK column is hidden, because the wizard correctly assigned it a column width of zero. Open the form and use the combo to select a record.
Notice that when the form opened, the combo was blank, and that it stayed blank if you used the lower Navigation Buttons on the form to change companies. Unless a default value has been set up, a blank combo looks like an empty text box waiting for data entry. If you specify a default value, however, it will be clear to users that a list is available. We will now learn to use the Property Sheet of the combo to provide defaults and more. Like ALL EXAMPLES this one assumes you have properly placed the primary key as the first element in the combo.
If your combo or list box is not used for navigating through a table or query, you would still need a default. Here is a simple way to always provide your users with defaults for the combos and lists you have in your interface. Instead of the Default Value as shown above, enter this as the default.
=[controlname].[ItemData](0)
With this technique, the first item in the combo or list will be the default. Remember that Access begins numbering with zero in combos and lists. To make the fifth item in the list the default substitute "(4)" for "(0)". Like ALL EXAMPLES this one assumes you have properly placed the primary key as the first element in the combo.
The next Property Sheet item concerns the sort order of companies. They are now in PK (primary key) order rather than in alphabetical order. We now will learn how to sort the combo list alphabetically by company name.

Open the form and verify the combo list is sorted by company name.
You can add and remove fields from the combo list with the Query Builder. But, such changes must be coordinated with the Format properties of the combo box. Here is a brief exercise explaining basic format properties.
Open the form and verify the changes you just made.
At this point all your wishes for the new combo box probably have been achieved. However, you may have noticed that when you move between companies by using the Navigation Buttons supplied by the Form Wizard, the company name in the combo does not correspond to that on the form. The combo still needs to be coordinated with the current record on the form.
Open the form and verify the changes you just made.
To this point we have used combos for navigating tables - selecting records from a table and viewing them on a simple form. Another major area in which combos are beneficial is data input. The advantage of combos over text boxes for data input is that you gain programmatic control of what users can input. When you use combos for data input controls, there will be no misspellings, typos, unacceptable choices, and so on. Because you will not have to deal with bad data, less programming will be required.
Examples of the kinds of lists you might want in combos are: Geographic Region, State, Month, Sex, Department, Company, etc. The main point is to offer your users a list of acceptable responses from which they are forced to choose.
Your list can be hard-coded (and probably should be for Sex and Month), or it can be table-based in the same fashion we have been working thus far. We will consider two examples of how to create combos. The first example is for hard-coded input of data on sex, and the second is for a hard-coded selection list for sex. Later, we will see how input combos and selection combos differ slightly.
If you want to follow the steps below, you will need a form on which to place the combo. You can continue to use the company form here, because we are only going to develop one short example at a time rather than an entire practical application. Later on, you can take the example and employ it in your own applications.
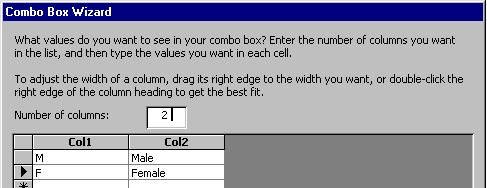
This is all very nice, but several things need adjusting. First, there is no DefaultValue, and second, the "M" and "F" are visible and would only confuse the users. We want users to see "Male" and "Female" instead, and we need the "M" and the "F" only for storage in a person's records. Here are the short cuts for correcting these two problems.
What is returned from the combos? The "M" and "F" are available for storage as data in the Sex field of the records. The data are referenced simply by using the combo box name. If you used the company form again, the Sex combo was probably called Combo28. The value in Combo28 is either "M" or "F". Access lets us ignore the column attribute in the case of column zero, so you could reference the "M" and "F" data either simply as Combo28, or by using the complete syntax of Combo28.Column(0). The second column holds "Male" and "Female" and it is referenced in VBA by the combo name plus the column attribute Combo28.Column(1).
Now we turn from combos as data entry controls to combos as selection controls. The situation we want to provide for the users is as follows. Our application should allow users to select salary reports based on the sex of employees. Salary reports are to be available for males, females, and both sexes combined. The combo will permit the users to choose from among the three report types.
Follow the steps for hard-coded combos for data input, and change the Row Source to reflect the new options shown below.
C   Male and Female
M   Male
F   Female
At this point, Combo28 will contain either "C", "M", or "F". Your report program will now know which of the three type of reports to prepare for users. The next section deals with selection lists that can not be hard coded.
If you want to follow the steps below, you will again need a form on which to place the combo. You can continue to use the company form, because we are only creating very simple examples. We will presume that the company form or a similar, simple form is available at this point.
Here is the situation. Our application should allow users to select companies for inclusion in a revenue report. One company may be selected, or users may request revenue figures for all companies combined. This requirement is not too different from the previous selection example, except that we will need to use SQL programming to place "< All companies >" in the combo list.
Use your form and create a company combo. (See Combo Box Wizard earlier.) Remember that this is an isolated example of combo techniques. As such, it may seem odd in the presence of the other company navigation combo. After you have created a combo, follow the steps below. Like ALL EXAMPLES this one assumes you have properly placed the primary key as the first element in the combo.
SELECT tblCompany.CompanyID, tblCompany.CompanyName
FROM tblCompany
ORDER BY tblCompany.CompanyName;
SELECT tblCompany.CompanyID, tblCompany.CompanyName
FROM tblCompany
UNION SELECT "0", "< All companies >"
FROM tblCompany
ORDER BY tblCompany.CompanyName;
Several other details should be discussed. First, you may want to have the Default Value shown to the users be < All companies >. If so, change the Default Value property to 0 (zero). Second, for your program to know that the user selected < All companies >, it must determine whether the following statement is true or false.
Combo26 = 0
If you need to add other options to the list (for example "< Non-American companies >") just expand the Union Selection as shown below. Notice that because PK's are never negative for the companies, using values of -1 and -2 will distinguish these choices from regular company choices.
SELECT tblCompany.CompanyID, tblCompany.CompanyName FROM tblCompany
UNION SELECT "-1", "< Non-American companies >" FROM tblCompany
UNION SELECT "-2", "< All companies >" FROM tblCompany
ORDER BY tblCompany.CompanyName;
This concludes the introductory exercises on combo boxes. List box exercises will now be presented.
We will rely on what you learned in the previous section and begin by stating our learning objectives regarding list boxes. First we will develop a list box of city names based on tblCompany. We will have the list box selections control the contents of a second list box that will contain company names and city names. Then, using UNION SELECT again on the first list box, we will provide a user option for < All cities >.
Because this exercise uses SQL programming, you should name the list boxes and the form exactly as stated in the steps below. If your names differ, then you must remember to make the corresponding changes in the SQL. It is much easier just to follow the instructions.
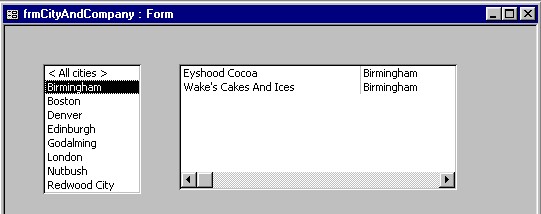
Creating a working list box with the wizard is fast, but we also need to modify the RowSource SQL to exclude redundant city names. Notice that London appears twice in lstCity.
Now create the second and final list box to the right of lstCity. Make it wider and include the following fields from tblCompany: CompanyID, CompanyName, and City. (You should already be familiar with the steps for getting this done quickly.) When you are finished, open frmCityAndCompany to verify that the second list box operates properly. In design mode, make adjustments to the size of the new list box as necessary. Finally, change its name to lstCompanyName. Follow these steps to have lstCity control what is displayed in lstCompanyName.
Follow these steps to have lstCity control what is displayed in lstCompanyName.
SELECT [tblCompany].[CompanyID], [tblCompany].[CompanyName], [tblCompany].[City]
FROM tblCompany;
SELECT [tblCompany].[CompanyID], [tblCompany].[CompanyName], [tblCompany].[City]
FROM tblCompany WHERE (([tblCompany].[City]=[Forms]![frmCityAndCompany]![lstCity]));
Private Sub lstCity_AfterUpdate()
    [Forms]![frmCityAndCompany].Recalc
End Sub
This concludes most of the list box instruction. The steps above should allow you to open frmCityAndCompany, click on London (or Birmingham) in the left list, and see two companies appear in the right list. All other cities have only one company in them. If this is not the case, then retrace your steps and look for mistakes.
The remainder of this document deals with enhancing the form you just completed by adding "< All cities >" into the left list and then introducing multi-select list boxes.
You may want to make a copy of frmCityAndCompany before you begin this exercise. It will be convenient to modify the copy rather than to rebuild a similar form with two list boxes. We will begin by adding "< All cities >" as the top item on the cities list (lstCity), and we will finish by programming the company names list (lstCompanyName) to behave according to the new cities list.
SELECT DISTINCT [tblCompany].[City] FROM tblCompany
UNION SELECT "< All cities >" FROM tblCompany;
Private Sub lstCity_AfterUpdate()
If [Forms]![frmCityAndCompany]![lstCity] = "< All cities >" Then

    [Forms]![frmCityAndCompany]![lstCompanyName].RowSource = _
    "SELECT [CompanyID], [CompanyName], [City] FROM tblCompany"
Else
    [Forms]![frmCityAndCompany]![lstCompanyName].RowSource = _
    "SELECT [CompanyID], [CompanyName], [City] FROM tblCompany" & _
    "WHERE City = '" & Me![lstCity] & "'"
End If
End Sub
"< All cities >" was the last exercise on the topic of single-selection list boxes. Some programming issues in multi-selection list boxes are discussed next.
Single-selection list boxes can be converted into multi-selection list boxes by making one change to the Property Sheet. On the Other tab, change Multi Select from "None" to "Simple".
To use the information from multi-selection list boxes, you have to know how many items were selected and the content of each of the selected items. In the single-selection case, this is not at all difficult. We can use one If statement to find out if the user selected the "< All cities >" item. Look at the partial If from the program just above.
If [Forms]![frmCityAndCompany]![lstCity] = "< All cities >" Then . . . .

' which could be shortened to this syntax if used in the form module:

If lstCity = "< All cities >" Then . . . .
If lstCity were a multi-select list, however, the value of [Forms]![frmCityAndCompany]![lstCity] (which could be written more simply as lstCity) would be the last user selection, but additional items could be selected as well. Here are some important variables to help you keep track of all of the selected items.
For example, suppose the user selected "London" and "Denver" from the multi-selection version of lstCity. Here is the kind of information you would get from Debug.Print as a result. Note: lstCity.ListCount is 9 cities, counting "< All cities >"
lstCity.Column(0,0) contains "< All cities >"   lstCity.Selected(0) is false
lstCity.Column(0,1) contains "Birminghan"   lstCity.Selected(1) is false
lstCity.Column(0,2) contains "Boston"       lstCity.Selected(2) is false
lstCity.Column(0,3) contains "Denver"        lstCity.Selected(3) is true
lstCity.Column(0,4) contains "Edinburg"     lstCity.Selected(4) is false
lstCity.Column(0,5) contains "Goldalming"   lstCity.Selected(5) is false
lstCity.Column(0,6) contains "London"        lstCity.Selected(6) is true
lstCity.Column(0,7) contains "Nutbush"      lstCity.Selected(7) is false
lstCity.Column(0,8) contains "Redwood City" lstCity.Selected(8) is false
You could reprogram lstCompanyName (previously created) into a multi-select list box and use the following procedure to verify all of the user's selections. You may recall that lstCompanyName had three columns: CompanyID, CompanyName, and City.
' program to verify (print) user selections for the programmer

Dim intItem As Integer
For intItem = 0 To lstCompanyName.ListCount - 1
If lstCompanyName.Selected(intItem) Then
    Debug.Print lstCompanyName.Column(0, intItem) & "," & _
    lstCompanyName.Column(1, intItem) & "," & _
    lstCompanyName.Column(2, intItem) & vbCr
End If
Next intItem
Here is an example taken from Access 2002 Help. The exercise shows how to multi-select companies from a list on the left of a form and send them to a list box on the right side of the form. As a user, you have probably encountered this sort of a technique before. Now you will be able to program your own version.
Begin by making a copy of frmCityAndCompany. We will be adapting it to speed up the exercise. Name the new form frmLeftToRight.

' The purpose of this procedure is to rebuild the right list based on left list selections

Private Sub cmdMoveHere_Click()
    Dim strItems As String
    Dim intItem As Integer
    For intItem = 0 To lstLeft.ListCount - 1
        If lstLeft.Selected(intItem) Then
            strItems = strItems & lstLeft.Column(0, intItem) & ";" & _
                                  lstLeft.Column(1, intItem) & ";" & _
                                  lstLeft.Column(2, intItem) & ";"
        End If
    Next intItem
    lstRight.RowSource = ""
    lstRight.RowSourceType = "Value List"
    lstRight.RowSource = strItems
End Sub
Save your work and test the example. You may want to improve the appearance of the new form by modifying the size of the list boxes. You could also insert a label or an instruction to the user under lstLeft, such as: This is a multi-select list box. Click several companies. Then click "Move Here".
This section will help you learn how to use the properties of these controls effectively.
Column() Property. You can use the Column property to assign the contents of a combo box or list box to another control, such as a text box. For example, to set the ControlSource property of a text box to the value in the second column (these indexes are base zero) of a list box, you could use the following expression. This works correctly for any selected item in the combo box or list box. Remember we usually reserve the first column (Column(0)) for the key.
=Forms!frmExample!lstCity.Column(1)But, if the user has made no selection when you refer to a column in a combo box or list box, the Column property setting will be Null. You can use the IsNull function to determine if a selection has been made, as in the following example:
If IsNull(Forms!frmExample!lstCity)
    Then txtSelectedCity = "No selection."
End If

' The same effect is illustrated below with another property

If Forms!frmExample!lstCity.ListIndex = -1 Then 'ListIndex is explained below
    Then txtSelectedCity = "No selection."
End If

' Here it is used in the ControlSource property of txtSelectedCity

=IIf(IsNull([Forms!frmExample!lstCity]),"not selected",[Forms!frmExample!lstCity].column(1))
To determine how many columns a combo box or list box has, you can inspect the ColumnCount property setting.
Selected() Property. You can use the Selected property in Visual Basic to determine if an item in a list box is selected. And, you can use the property to select items in a list box. Visually, a selected item appears highlighted. For example, the following expression selects the fifth item in the list:
Me!lstCity.Selected(4) = True
' To select the first item (maybe as a default) use this:
Me!lstCity.Selected(0) = True
ListIndex Property. You can use the ListIndex property to determine which item is selected in a list box or combo box.
The ListIndex property is an integer from 0 to the total number of items in a list box or combo box minus 1. Microsoft Access sets the ListIndex property value when an item is selected in a list box or list box portion of a combo box. The ListIndex property value of the first item in a list is 0. When no items are selected (highlighted) then ListIndex is set to -1.
List boxes also have a MultiSelect property that allows the user to select multiple items from the control. When multiple selections are made in a list box, you can determine which items are selected by using the Selected property of the control. The Selected property is an array of values from 0 to the ListCount property value minus 1. For each item in the list box the Selected property will be True if the item is selected and False if it is not selected.
The ItemsSelected collection also provides a way to access data in the selected rows of a list box or combo box. See Help.
ListCount Property. You can use the ListCount property to determine the number of rows in a list box or the list box portion (pull down) of a combo box. The ListCount property setting contains the total number of rows in the combo box list or list box. If the control is based on a table or query, the ListCount property setting contains the number of records in the table or query result set.
If you set the ColumnHeads property to Yes, the row of column headings is included in the number of rows returned by the ListCount property. For combo boxes and list boxes based on a table or query, adding column headings adds an additional row. For combo boxes and list boxes based on a value list, adding column headings leaves the number of rows unchanged (the first row of values becomes the column headings).
You can use the ListCount property with the ListRows property to specify how many rows you want to display in the list box portion (pull down) of a combo box.
ListRows Property.You can use the ListRows property to set the maximum number of rows to display in the list box portion of a combo box.
ItemData() Property. Use the ItemData property to great advantage when forms are loaded. This is an alternative to the Deafult property. Here is sample code for use in Form_Load() to help avoid blank combos, and to preselect the elements you want. ItemData() holds the first column (the bound column) of values in your combos and lists. Like ALL EXAMPLES this one assumes you have properly placed the primary key as the first element in the combo, so this is the bound column and can be accessed by ItemData().
    cboCompany = cboCompany.ItemData(0)' first item is defaulted*** see below
    cboIceCream = cboIceCream.ItemData(0)
    cboClass = cboClass.ItemData(0)
    cboLeftDate = cboLeftDate.ItemData(0)
    cboRightDate = cboRightDate.ItemData(cboRightDate.ListCount - 1)' last item is defaulted
Top of page